在上篇文章调度器的初始化,我们沿着runtime·rt0_go的代码分析了schedinit函数,这是runtime·rt0_go函数中的一步——完成了对调度器相关的初始化。但是,我们的程序还没运行起来。
这篇文章,我们接着看,分析下 main goroutine 是如何被创建的。
继续看runtime·rt0_go的代码:
 1
 2
 3
 4
 5
 6
 7
 8
 9
10
11
12
13
|
// src/runtime/asm_amd64.s#L351
// create a new goroutine to start program
// 创建一个新的 goroutine 来启动程序
MOVQ	$runtime·mainPC(SB), AX		// entry, mainPC就是runtime.main函数
PUSHQ	AX  // AX = &funcval{runtime.main}
CALL	runtime·newproc(SB)   // 创建 main goroutine
POPQ	AX  //

// start this M
CALL	runtime·mstart(SB)  // 主线程进入调度循环,运行刚刚创建的 goroutine
// runtime.mstart 函数应该永远不会返回的,如果返回了,一定是代码逻辑出问题,直接abort
CALL	runtime·abort(SB)	// mstart should never return
RET
|
这段代码有三个函数值得关注,分别是:
- runtime.main,该函数先执行
runtime.main函数的内容,最终会调用到我们写的main.main函数
- runtime.newproc,该函数用于创建新的 goroutine
- runtime.mstart
先看newproc函数:
 1
 2
 3
 4
 5
 6
 7
 8
 9
10
11
12
13
14
15
16
17
18
19
20
21
22
23
|
// src/runtime/proc.go#L4238
// 创建一个运行 fn 的 g
// Create a new g running fn.
// Put it on the queue of g's waiting to run.
// The compiler turns a go statement into a call to this.
func newproc(fn *funcval) {
  // getg 获取正在运行的g,在初始化的场景中就是m0.g0
	gp := getg()
  // getcallrpc 返回一个地址,也就是调用 newproc 时由 call 指令压栈的函数返回地址
  // 对于初始化场景,pc 就是 CALL	runtime·newproc(SB) 指令后面的 POPQ AX 这指令的地址
  // 这个地址现在存放的就是 &runtime.mainPC
	pc := getcallerpc()
	systemstack(func() {
		newg := newproc1(fn, gp, pc)  // 创建一个新的 g

		pp := getg().m.p.ptr()  // 取出 p
		runqput(pp, newg, true) // 将新创建的 g 放入全局可运行队列

		if mainStarted {
			wakep()
		}
	})
}
|
newproc函数是对newproc1函数的一个包装,这里主要的工作有两个:
- 获取 fn 函数的地址。
- 使用
systemstack函数切换到g0栈。
这里需要多问一句:为什么需要传递 fn 函数地址给 newproc 当参数呢?
原因在于 newproc 函数会创建一个新的 goroutine 来执行 fn 函数,而新建的 goroutine 与当前的 goroutine 会使用不同的栈,所以就需要在创建 goroutine 的时候把 fn 需要用的参数从当前 goroutine 的栈拷贝到新的 goroutine 的栈上之后才能够让其继续执行。
newproc1函数的第一个参数 fn 就是新创建的 goroutine 要执行的函数, fn 是一个funcval 结构体类型,其定义如下,它是一个指针类型,而且可变大小。
1
2
3
4
|
type funcval struct {
	fn uintptr
	// variable-size, fn-specific data here
}
|
我们继续看下newproc1函数:
  1
  2
  3
  4
  5
  6
  7
  8
  9
 10
 11
 12
 13
 14
 15
 16
 17
 18
 19
 20
 21
 22
 23
 24
 25
 26
 27
 28
 29
 30
 31
 32
 33
 34
 35
 36
 37
 38
 39
 40
 41
 42
 43
 44
 45
 46
 47
 48
 49
 50
 51
 52
 53
 54
 55
 56
 57
 58
 59
 60
 61
 62
 63
 64
 65
 66
 67
 68
 69
 70
 71
 72
 73
 74
 75
 76
 77
 78
 79
 80
 81
 82
 83
 84
 85
 86
 87
 88
 89
 90
 91
 92
 93
 94
 95
 96
 97
 98
 99
100
101
|
//  src/runtime/proc.go#L4256
// Create a new g in state _Grunnable, starting at fn. callerpc is the
// address of the go statement that created this. The caller is responsible
// for adding the new g to the scheduler.
func newproc1(fn *funcval, callergp *g, callerpc uintptr) *g {
  // 判断 fn 是否有效,如果无效直接fatal
	if fn == nil {
		fatal("go of nil func value")
	}

  // acquirem 返回当前g所在的m, 在初始化场景这里就是g0
	mp := acquirem() // disable preemption because we hold M and P in local vars.
	pp := mp.p.ptr()
	newg := gfget(pp)  // 从 p 的本地缓存队列中取没有使用的 g,初始化时肯定没有,所以返回nil
	if newg == nil {
    // 创建一个 g 结构体对象newg,在堆上为其分配 2KB 大小的内存
    // malg 函数中会设置g的 stack 成员和两个 stackgard 成员
		newg = malg(_StackMin)
    // 将 newg 设置为 _Gdead 状态,此时 newg 还没有被初始化
		casgstatus(newg, _Gidle, _Gdead)
    // 将 newg 放入全局 allgs 切片中
		allgadd(newg) // publishes with a g->status of Gdead so GC scanner doesn't look at uninitialized stack.
	}
	if newg.stack.hi == 0 {
		throw("newproc1: newg missing stack")
	}

	if readgstatus(newg) != _Gdead {
		throw("newproc1: new g is not Gdead")
	}
	// 下面主要是调整 newg 的栈顶指针,并做一些必要的成员初始化
  // 计算运行空间大小,并对齐
	totalSize := uintptr(4*goarch.PtrSize + sys.MinFrameSize) // extra space in case of reads slightly beyond frame
	totalSize = alignUp(totalSize, sys.StackAlign)
	sp := newg.stack.hi - totalSize  // 确定 SP 指针的位置

  ......
	// 将 newg.sched 结构体成员清空
	memclrNoHeapPointers(unsafe.Pointer(&newg.sched), unsafe.Sizeof(newg.sched))
  // 设置 sched 成员,调度器需要依靠这些成员才能够将其调度器 CPU 上去执行
	newg.sched.sp = sp
	newg.stktopsp = sp
	newg.sched.pc = abi.FuncPCABI0(goexit) + sys.PCQuantum // +PCQuantum so that previous instruction is in same function
	newg.sched.g = guintptr(unsafe.Pointer(newg))
	gostartcallfn(&newg.sched, fn)
	newg.gopc = callerpc
	newg.ancestors = saveAncestors(callergp)
  // 设置 newg 的 startpc 为fn.fn, 该成员主要用于函数调用栈的 traceback 和栈收缩
  // newg 真正从哪里开始执行并不依赖这个成员,而是 sched.pc
	newg.startpc = fn.fn
	if isSystemGoroutine(newg, false) {
		sched.ngsys.Add(1)
	} else {
		// Only user goroutines inherit pprof labels.
		if mp.curg != nil {
			newg.labels = mp.curg.labels
		}
		if goroutineProfile.active {
			// A concurrent goroutine profile is running. It should include
			// exactly the set of goroutines that were alive when the goroutine
			// profiler first stopped the world. That does not include newg, so
			// mark it as not needing a profile before transitioning it from
			// _Gdead.
			newg.goroutineProfiled.Store(goroutineProfileSatisfied)
		}
	}
	// Track initial transition?
	newg.trackingSeq = uint8(fastrand())
	if newg.trackingSeq%gTrackingPeriod == 0 {
		newg.tracking = true
	}
  // 设置 newg 为 _Grunnable 状态,之后 newg 就可以运行了
	casgstatus(newg, _Gdead, _Grunnable)
	gcController.addScannableStack(pp, int64(newg.stack.hi-newg.stack.lo))

	if pp.goidcache == pp.goidcacheend {
		// Sched.goidgen is the last allocated id,
		// this batch must be [sched.goidgen+1, sched.goidgen+GoidCacheBatch].
		// At startup sched.goidgen=0, so main goroutine receives goid=1.
		pp.goidcache = sched.goidgen.Add(_GoidCacheBatch)
		pp.goidcache -= _GoidCacheBatch - 1
		pp.goidcacheend = pp.goidcache + _GoidCacheBatch
	}
	newg.goid = pp.goidcache
	pp.goidcache++
	if raceenabled {
		newg.racectx = racegostart(callerpc)
		if newg.labels != nil {
			// See note in proflabel.go on labelSync's role in synchronizing
			// with the reads in the signal handler.
			racereleasemergeg(newg, unsafe.Pointer(&labelSync))
		}
	}
	if trace.enabled {
		traceGoCreate(newg, newg.startpc)
	}
  // 对应acquirem
	releasem(mp)
	// 返回 newg
	return newg
}
|
整个函数的注释都标注在上面了,并不是很难理解。总结一下,newproc1函数主要做了:
- 尝试从 p 的本地缓存队列取空闲的 g,如果取不到,直接创建,并设置为
_Gdead状态,并加入全局 g 列表
- 整理 g 的 stack 成员和 stackgard 成员,也就是为栈空间做清理和准备工作
- 初始化 g 的 sched 成员,为调度器调度 g 做好必要的设置
- 将 g 设置为
_Grunnable状态,并返回 g, 等待调度器的调度
比较难理解的点在gostartcallfn函数,我们详细分析下这几行:
 1
 2
 3
 4
 5
 6
 7
 8
 9
10
11
12
13
14
15
16
17
|
// 把 newg.sched 成员的所有成员都设置为零,即清空
memclrNoHeapPointers(unsafe.Pointer(&newg.sched), unsafe.Sizeof(newg.sched))
// 开始设置 sched 成员的各个字段,调度器必须依靠这些字段才能够把 goroutine 调度到 CPU 上去执行
// 设置 newg 的栈顶指针 sp
newg.sched.sp = sp
newg.stktopsp = sp
// newg.sched.pc 表示当 newg 被调度执行时从这个地址开始执行指令
// 这里设置成了 go.exit 函数偏移1 (sys.PCQuantum为1),这是为什么呢
// 等看完 gostartcallfn 函数就明白了
newg.sched.pc = abi.FuncPCABI0(goexit) + sys.PCQuantum // +PCQuantum so that previous instruction is in same function
// 设置 g 指针
newg.sched.g = guintptr(unsafe.Pointer(newg))
gostartcallfn(&newg.sched, fn)
newg.gopc = callerpc
newg.ancestors = saveAncestors(callergp)
// startpc 表示 goroutine 要运行的函数指针
newg.startpc = fn.fn
|
这段代码先对 newg 的 sched 成员进行初始化,主要包括两个指针,分别是 sp 和 pc。sp 表示当 newg 被调度起来运行时所使用的栈顶,pc 表示当 newg 被调度起来运行时从这个地址开始执行指令。然而要理解为什么设置 pc 为 goexit 函数的第二条指令地址而不是 fn.fn,要回答这个问题,需要进一步分析 gostartcallfn 函数:
 1
 2
 3
 4
 5
 6
 7
 8
 9
10
11
12
|
// src/runtime/stack.go#L1127
// adjust Gobuf as if it executed a call to fn
// and then stopped before the first instruction in fn.
func gostartcallfn(gobuf *gobuf, fv *funcval) {
	var fn unsafe.Pointer
	if fv != nil {
		fn = unsafe.Pointer(fv.fn)
	} else {
		fn = unsafe.Pointer(abi.FuncPCABIInternal(nilfunc))
	}
	gostartcall(gobuf, fn, unsafe.Pointer(fv))
}
|
从代码可以看到,gostartcallfn从参数 fv 中取出函数地址(初始化时,就是runtime.main),然后继续调用gostartcall函数。
 1
 2
 3
 4
 5
 6
 7
 8
 9
10
11
12
13
14
15
16
17
18
|
// src/runtime/sys_x86.go#L14
// adjust Gobuf as if it executed a call to fn with context ctxt
// and then stopped before the first instruction in fn.
func gostartcall(buf *gobuf, fn, ctxt unsafe.Pointer) {
  // sp 就是当前 newg 的栈顶
	sp := buf.sp
	sp -= goarch.PtrSize  // 为返回地址预留空间
  // 从上面的代码分析可以知道 buf.pc 现在存放的 goexit + 1 的地址
  // 这里将其放到调整后的 sp 位置,这里为了伪装 fn 是被 goexit 函数调用,从而使得 fn 执行完毕以后
  // 回到 goexit 继续执行,完成清理工作
	*(*uintptr)(unsafe.Pointer(sp)) = buf.pc
  // 重新设置 newg 的栈顶指针 sp
	buf.sp = sp
  // 将 fn 重新放在 pc 上
  // 等到 newg 被调度执行起来时,调度器会把 pc 放入 CPU 的寄存器,从而执行指令
	buf.pc = uintptr(fn)
	buf.ctxt = ctxt
}
|
所以,gostartcall函数主要有两个作用:
- 调整 newg 的栈空间,把对 fn 的调用伪装成 goexit 调用了 fn,目的是 fn 执行完毕以后,执行 RET 指令时返回 goexit 继续执行完成清理工作
- 重新设置 newg.sched.pc 为需要执行的函数 fn 的地址,目的是 newg 被调度起来运行时从这个地址开始执行指令,即运行用户代码(这个场景里是 runtime.main)
分析完成gostartcallfn函数,我们再次回到newproc函数,最终在上一张图的基础上我们得到这张图:
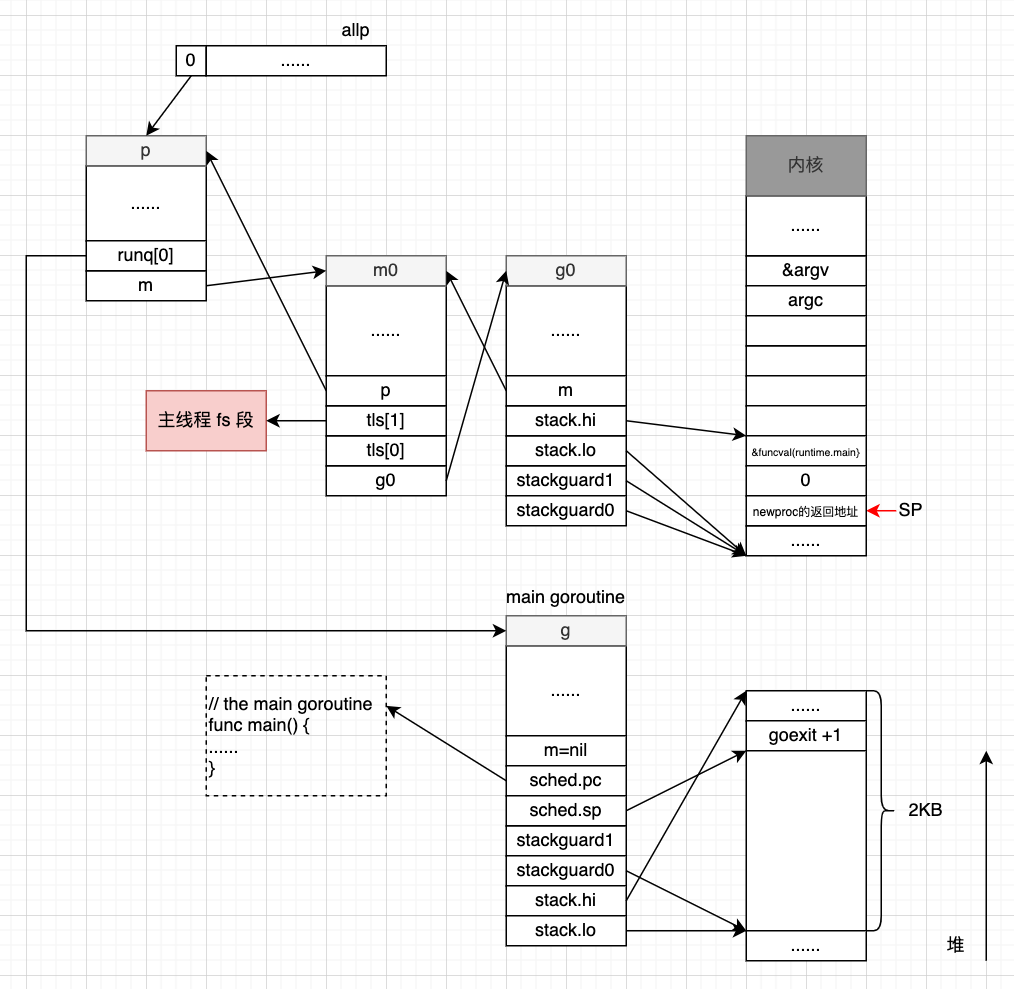
关于 main goroutine 我们结合图稍作一些解释:
- 代表 main goroutine 的 g 结构体的初始化,在这个阶段完成了对 sched 成员的初始化,因为调度器需要根据该成员的内容才能够将其调度到 CPU 上去执行。
- 但是,此时 newg 还没有并运行,只是被放到了 p 的本地可运行队列,等待被调度执行。因为还没有其他 goroutine,所以它被放到了
p.runq[0]上。
- 最后,newg 的 m 成员还是 nil,也就是还没有被调度起来运行,还没有跟 m 进行绑定。
至此,我们分析了程序中第一个 goroutine(也就是 main goroutine)的诞生。
最后,我们回顾下G结构的几点内容:
- 关于 goexit 函数。我们写代码的时候,通过
go关键字很容易创建一个 goroutine,在 goroutine 完成必要的工作以后,并不一定需要显式调用goexit退出 goroutine,这是因为 newproc 函数在创建 goroutine 的时候已经将 goexit 函数放在栈顶合适的位置,以便 goroutine 退出以后做必要的清理工作。
- 每个 goroutine 都有自己独立的栈空间。g 结构体中指向了g所需要的栈空间大小,默认为 2KB,可以自动伸缩。所以,从内存角度看,goroutine 就是一段独立的内存空间,经由 runtime 的调度,最终被操作系统调度到 CPU 上执行。
参考资料
- https://mp.weixin.qq.com/s/FF8YU8nXP9TKt0qvSuzmtw